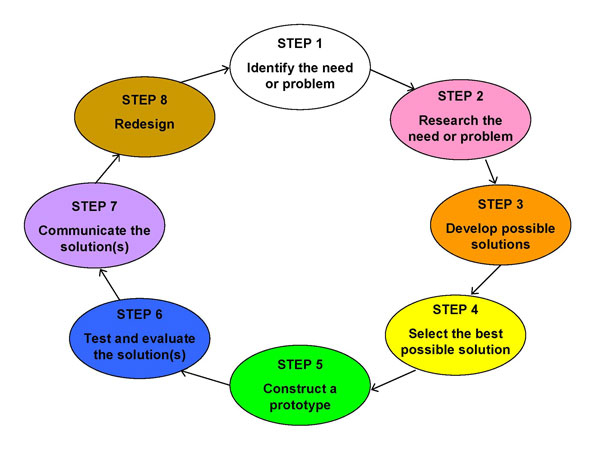
The design steps - a working reference guide
Start by creating a Design Folio, which is a record of how you started, what you discovered, designed, created and evaluated. The design folio template is linked here.
Exploring and defining the task involves the undertaking to identify and explore a need or opportunity of a design project, taking into consideration the user, the client (the person you are designing your project for - your teacher), the available resources and social, ethical and environmental issues. You need to establish the criteria for a successful design solution, set milestones and define the constraints for the project in a statement or brief.
Write a specification
This detailed description of the problem spells out what the design must achieve and what limitations will affect the final solution. This is part of your folio.Write a brief
Write a short statement in your folio giving the general outline of the creation or problem to be solved.Analise the situation
Before beginning the design project you need to sort out what your project is to be about and what issues you are trying to address in the project.
Write a folio brief
Write a short statement in your folio giving the general outline of any problems which you need to solve.
Generating and developing ideas involves exploring all the options, considering existing solutions, generating alternatives, representing and refining those ideas and deciding upon the final options. You need to identify, explore and select resources such as techniques, materials and equipment that will best achieve the solution, taking into account short-term and long-term impacts of their decisions and actions.
Research the problem
Sometimes a problem can be solved 'straight out of your head', but in most cases there is a need to gain some new information and knowledge.
Possible solutions involves students researching the possible options for the project. Looking at what others have used in the processes to develop their design creations.
Work out possible solutions
Combine all the ideas with information obtained from research to suggest several possible design solutions. Sketch several possibilities on paper or in software such as Photoshop, Illustrator, or even Word.Select a preferred solution
Decide which solution to develop. Although the chosen solution should, ideally, be the one that best satisfies the specifications. Other constraints such as time, cost, or skills may limit the decision.
Producing solutions involves finalising design decisions; completing final design representations such as production drawings or storyboards; sequencing the step-by-step actions for production; managing safety risks; practicing and refining techniques; and completing the production of the solution. Students reflect on the success of the solution, the process and the learning.
Construct a design prototype which involves creating a min-version of the intended design project, to evaluate how it is all going to work.
Evaluate how the prototype worked and how it can be improved or made less complex, while achieving the planned design concept.
Write a specification (in your folio)
This detailed description of the problem spells out what the design must achieve and what limitations will affect the final solution.
With information obtained from your research to suggest several possible design solutions. Sketch several possibilities on paper.
Planning, managing and evaluating is an essential component of each of the above phases. Management decisions made by students involve planning and reviewing milestones and implementing and monitoring time, actions and financial plans.
Ongoing formative evaluation, related to the criteria of success, informs the decision making at each phase and the evaluation at the conclusion of the project involves reflection and learning about the process used and the success of the solution.Where there were 'issues' with the project, what were they and how were they resolved.
Understand the limitations for the design project.
- Identify the design project limitations.
- What is the total time available for the project? - When is it due by.
- Is there a budget for any resources needed that may need finance? - Probably not, but keep in mind - software licences etc.
- What are the required resources needed? - These could be non-software and equipment resources and could be other students (actors) needed for a video, or a photo shoot background, a green screen, etc.
- What equipment and facilities do you have available? Do you need a still or video camera, a tripod, a laptop to borrow from the I.D.M.T. resources.
Test and evaluate the design and make (any) design modifications
Testing is ongoing as the design construction process, but a final test of the entire system or design model proves if the project does the job for which it has been designed. Look back at the specifications and check all the requirements carefully.
Ask questions such as:
How well does the design function?
Does the design look good? Is the product safe to use?
Were suitable materials used? How could the design be improved upon?
Is there a need to re-design any part of the project to make the design better visually, perform better, to achieve the intended goals?
What had to be re-designed to make the project work (or work better).
| Processes | Materials | Examples | Home Page |