Set up and troubleshooting
Steps
- Update the firmware of the Anki cars using the phone Anki Overdrive App
- Insert the micro SD card into the Raspberry Pi
- Ensure the Raspberry Pi has the latest image. Resources
- Plug a mouse and keyboard into the Raspberry Pi’s usb ports.
- Plug a HDMI cable into a monitor or TV and into Raspberry Pi.
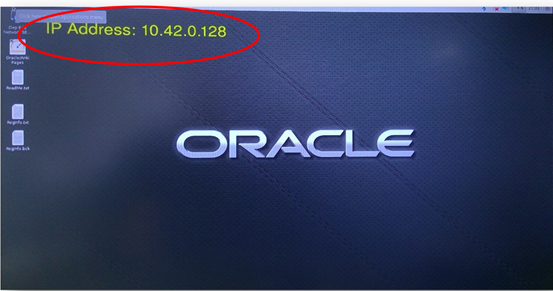
- Plug in the power to the micro usb power supply. This will turn on and boot up the Raspberry Pi
- The Oracle interface will appear.
- After connecting to the network students will be able to use the Google Chrome browser on their desktop or laptop to type in the Raspberry Pi’s IP Address and use the Oracle Pages.
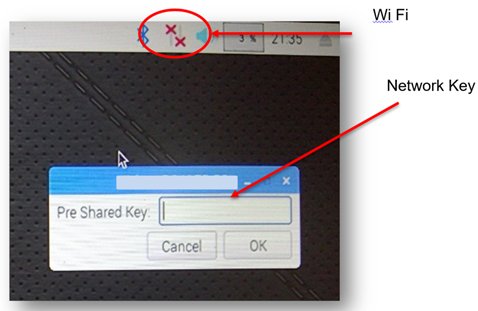
To connect to the wi-fi from home (or anywhere other than a Department of Education school) click on the wi-fi icon on the top right menu and follow the prompts to add your security key.
Once your Raspberry Pi is on the network the wi-fi icon will change to indicate this connection has been made.
To connect to the Department of Education network at school use the icon on the upper left of the screen and follow the prompts until your wi-fi icon indicates the connection has been made.
Troubleshooting: If the wi-fi does not connect to the internet use an Ethernet cable to connect your Raspberry Pi to your local area network to complete the coding challenges below.
There are two issues that can prevent the Pi to connect to the network.
- Wi-fi. The setup tool should work for wi-fi in most cases.
- If not, the physical network can be used (plug an Ethernet cable into the Raspberry Pi).
- Proxy. The proxy should work in all cases.
- An issue is in some schools access to the network requires the long name username ‘e.g.peter.john.davis’ is used. In others the proxy requires the short username ‘e.g.pdavis13’
- Try one, and if it doesn’t work, try the other.
- Seek assistance with the school IT support.
Please post all problems, solutions, ideas, successes and failures to the Fast and Curious DoE Yammer group.
The Network can be tested by just using the browser and going to oracle.com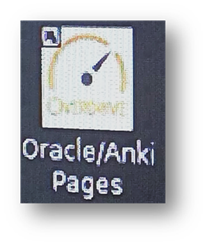
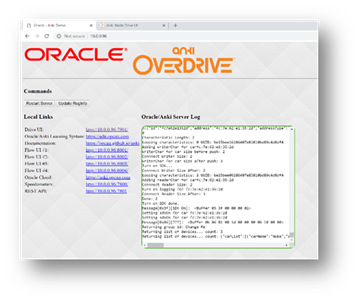
Click on the Oracle Pages icon to open the application. You will:
- Check the connection to the cars.
- See the data being exchanged via the Server Log
- Allocate one of four cars to each team.
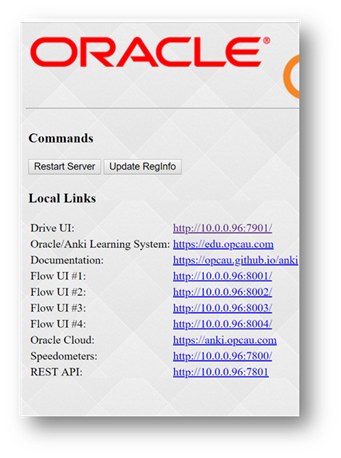
The Oracle Anki User Interface will show:
- Commands
- Restart server
- The Oracle software on the Raspberry Pi acts as the server. This restarts this functionality.
- Update RegInfo
- This is needed when you wish to send your race data to the Oracle Cloud
Local links
- Drive UI (user interface)
- Used to connect and check the vehicles are sending and receiving data from the Raspberry Pi server.
- Oracle Anki Learning System
- Where you will find the programming challenges
- Documentation
- Where you find files on Github used in this setup.
- Flow UI (User Interface 1 to 4)
- This enables 4 teams of students to each program their chosen vehicle from their desktop or laptop. For example – UI#1 may be allocated “Nuke”, UI#2 Guardian and so on.
- Oracle Cloud
- Hosts the data from your races
- Speedometers
- Provides a display of the speeds
- REST API
- A RESTful API is an application program interface (API) that uses HTTP requests to GET, PUT, POST and DELETE data. It allows communication between a web-based client and server that uses representational state transfer (REST) constraints.
- For further information well beyond of this course see: What is a REST API?
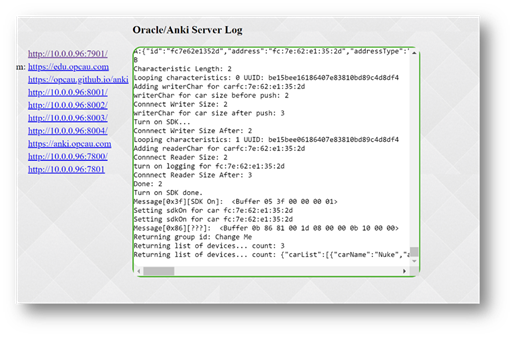
- The Oracle/Anki Server Log
- You will notice each car has a unique identification number, its MAC address in hexadecimal.

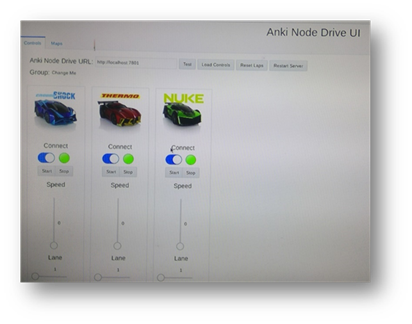
Click on the Driver UI link
- Select the test tab.
- Select the Load Controls.
- The cars and controls should appear.
- Switch the left button for each car to blue
- The green light indicates the car is connected and data can be exchanged.
- Test the cars on the track. Use the vertical scroll bar to control speed and the horizontal scroll bar for the lanes
If the controls do not appear:
- Ensure the Raspberry Pi is on.
- Ensure the firmware for each car has been updated through the phone app.
- Ensure all other surrounding Blue tooth devices are switched off.
- Ensure that the cars are charged and close to the Raspberry Pi.
- Click the Restart the server tab.
Student will use the Google Chrome browser on their desktop or laptop to type in the IP address of the Raspberry Pi and connect to the OracleAnki UI
Each team will be allocated a car and a FlowUI number.
For example Team 1 may have Nuke and use the FlowUI #1
Team 2 may have Thermo and use FlowUI#2 and so on.
This will ensure that each team is responsible for coding their own vehicle without interfering with the other team’s car.
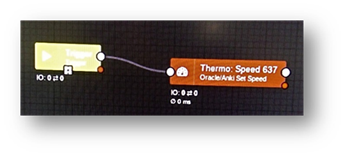
Student teams will open their Flow UI and attempt the Challenges provided by dropping and dragging components.
Double clicking on components will provide further options to change settings for example which car to Set speed.
Note – every task needs a Trigger component.
This example has been wired to the SetSpeed component and the settings changed to Thermo by double clicking the component.
After wiring up the components by linking the white nodes on each component students apply settings
Note – to apply the code to a vehicle is a three step process.
After applying settings start the process by clicking on the small white box on the bottom of the Trigger component.
If everything is connected the car will change behaviors according to the Flow code.
Flashing an image on the Raspberry Pi micro SD card
Copying the Oracle Anki operating system image files onto a micro SD card is an essential to this project.
Etcher is a free software that will achieve this in three simple steps: Select Image, Select Drive, and Flash Image.
Step 1
Install in Windows or Mac.
Download and install Etcher from the website.
Double-click the .exe file in Windows and follow the Etcher setup wizard. Drag the Etcher app to your Applications folder on a Mac and double-click to open it.
In Windows, run Etcher in Administrator Mode: right-click on Etcher and choose ‘Run as administrator’.
Step 2
Download a copy of the latest Oracle/Anki image.
(Or the OS image you want to install). Unzip the file after it has downloaded. Double-click the file in Mac. In Windows, right-click the file and choose Extract All. Etcher can install directly from a ZIP file, but the process takes a lot longer.
Step 3
Click Select Image in Etcher. Use the file manager window and locate the image you unzipped in the previous step. Select Open. The image will appear under Select Image, and Connect a drive will highlight red.
Step 4
Insert your SD card.
Attach your SD card to the computer. Etcher will select it automatically. Etcher won’t write to your hard drives by default, but check that the SD card is listed correctly. Now click Flash! to write the image file to the SD card.
Step 5
Writing the image.
Etcher will format the SD card, before writing and verifying the image; this is shown by a progress bar. When done, remove the SD card, insert it into your Raspberry Pi, and power it up.
The Oracle page will load.
If you want to flash another SD card with the same image, insert it and click Use Same Image.