The Cameras
They are all Panasonic Lumix Digital Still and Video Cameras.
The camera models are DMC-FZ200 and have a 25mm wide angle to 600mm zoom lens, with auto focus.
When shooting a video, a tripod is preferable, to avoid camera shake, which does not look good in a video.
There will be tripods available for each camera.
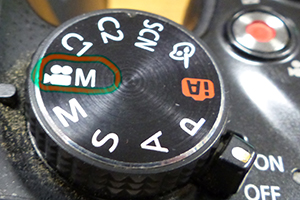
How to set the video.
Make sure the mode dial is set to:
Turn the camera On.
Set the zoom angle.
Use the camera's back viewing screen to monitor the video. If the screen is not showing, use the top left button - EVF/LCD to activate.
There is 20 minutes of video per file available for storage.
Again the shoot does not need to be as one video and can be several to many and then joined at the editing stage in the software.
Learn the Camera's Functions:
1/. Learn the main functions of the camera to be used to make the video, as each camera is different .The cameras we will be using are DSLR (still digital) and video cameras combined.
2/. Identify the main operating parts of the camera.
2.1. View the back screen while shooting.
2.2. Identify which is the On/off button.
2.3. Identify which is the record button, the Pause button, the Stop button, the Zoom into Zoom out functions.
2.4. Understand the Tripod – connect it to the camera. (Always use a tripod for video, as otherwise you will have a "jumpy video". You can always pan the camera on the tripod (slowly move it around horizontally).
2.5. Light Source – keep the bright light source behind the camera, not in front, as the light needs to be shining on the subject. Backlighting occurs when this is not done!
2.6. Framing/Composing the shot. Plan (frame) the subject properly within the viewfinder. Think about what you need to have (and do not need to have) on film. Are feet necessary for a close up portrait shot? No! Do not cut off heads or hair. Make sure you have everyone that needs to be in the shot, in the shot. Watch your left and right sides and remember they are the reverse of the actors left and right. If directing point and say "my left", or "my right".
Shooting the scenes.
Decide what you need, read the script and storyboard before shooting.
Wide angle, close up, mid angle and plan accordingly.
You can zoom in/out slowly when shooting too.
Ensure the focus is set to auto, so no blurry scenes.
If there is a re-shoot, just do it, as a separate file, which can be joined later in the editing process.
Watch out for "unwanted" backdrop areas, such as scenery/props not needed. Use the zoom to remove/distance them from a scene to be shot.
Avoid rapid movement of the camera, unless it's a fast action scene.
If you are using the sound from the shot video, watch out for unwanted sounds (and comments). The camera mics are quite sensitive!
Above all be creative and enjoy the learning experience!
2.4 Remember the main light source should be behind the camera.
2.5 Noise – distractions: avoid them. Avoid crew conversations while shooting, as this will be "heard" in the final video
2.6 Review the Camera Angles. Close Up, Wide Angle, Zoom. Avoid fast movements of the lens to change the view. It is better to pause filming, make the change and then start the next scene.
2.61. Camera angles – the position of the camera to the subject is most important
2.62. Zooming – zoom in to have the subject close up and zoom out when the scenes are more distant - in the background or panoramic. This can vary from really close up (zoom in)
2.63. Close up (Partial zoom in), centred (mid zoom) and distance (zoom out).
2.64. Care needs to taken when filming – not too many changes from close up to zoom, tilting and if panning (using sweeping movements). When needed do these slowly.
2.65. Keep shots short – to keep the action moving, where possible. Just like they do on TV!
2.66. The Rule of Thirds. Is a good principle to keep in mind when arranging your subject matter within your filming.
Imagine two horizontal and two vertical lines dividing your video/photo into thirds with four intersecting points. Your main subject is where the lines cross rather than centred in the frame, and situating the horizon on the upper or lower line usually makes a well-composed landscape photo.
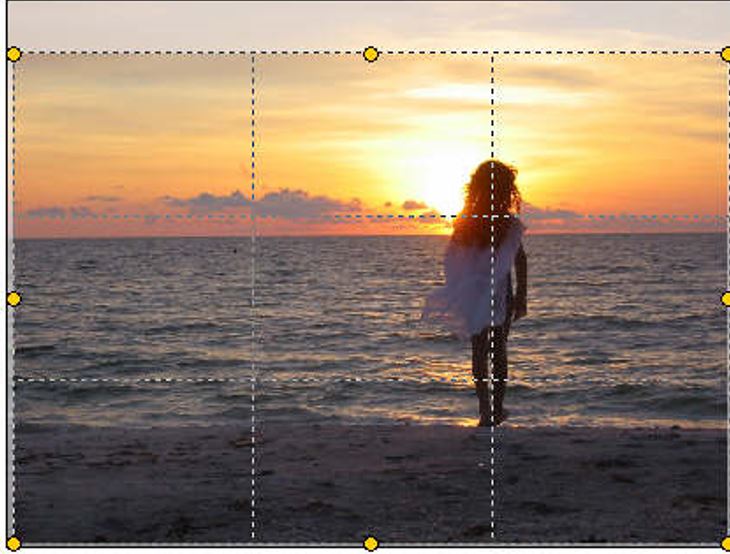
For a vertical shoot, (not really recommended in videoing) placing the person’s face where lines cross can make a more compelling shoot than if the person is centred. It all depends on your background. Close ups such as someone at a desk or a group of students works in the opposite and needs to be really tight framing.

The cameras also take still photos.
Just change the mode dial to green and follow the zoom and focussing instructions in 2/. above.
| Here's the starter link | Scripting the Video | Storyboarding | Casting | Props & Green Screening | The Cameras - How to use | Video Editing | Sound Editing/Dubbing | Index |