Coding - Website Building in Dreamweaver.
Open Dreamweaver.
Create a New Page.
Then open the Properties window.
Window/Properties.
Create your Template Page, which all the other five (5) pages will be copied off.
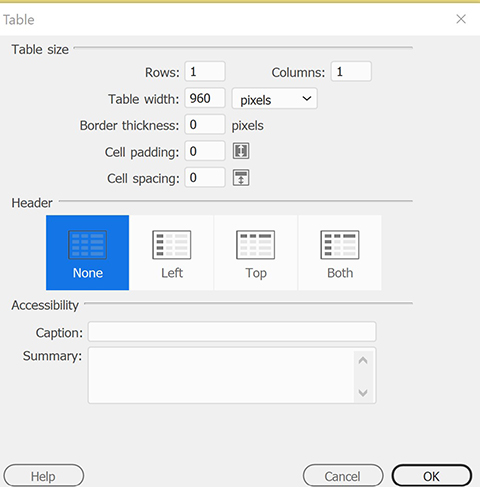
1/. Insert a Table 960px wide, 1 column, Border Thickness 0, Cell Padding 0, Cell Spacing 0.
See screenshot image:
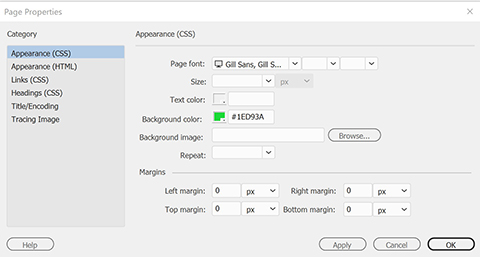
2/. With the cursor outside the table - open the Properties dialogue window. (Window/Properties) and make the following changes:
Then change the Document Page Title to Index Page.

3/. Still in the Properties window, make the following changes to the page:
Font: Gill Sans.
Background Colour: - Use the colour picker to find a suitable colour.
Margins: Fix up the margins to zero, see below.
4/. Change the Table background to a different colour.
With the cursor inside the table, using the Bg select a light colour..

5/. Place the cursor inside the bottom of the table and create a new table row and using the TAB key, select TAB then do this again six times. In using the TAB key you will create six more rows.
The first row will be your heading. This will be added individually to the tables after your template is completed.
The last (seventh) row will be your links nested table.
The other rows (2,3,4,5,6 will contain images and image descriptions, of at least two sentences.
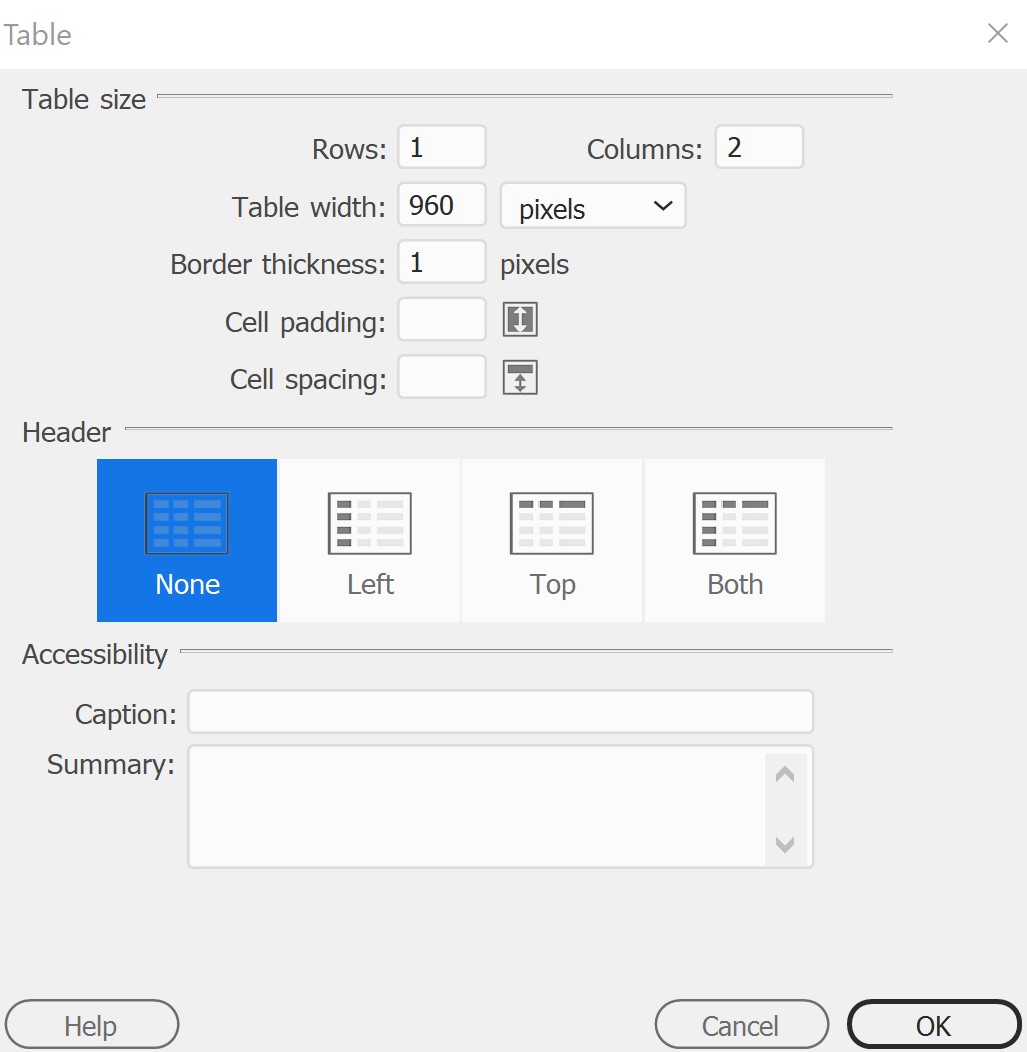
5/. Create nested tables with two columns in rows 2,3,4.5,6 Leave the last row 7 as is for the moment.
To do this New Table, 1 Row, 2 Columns.
Copy/Paste this table into rows 3,4,5,6.
6/. To finish off your page, in Row 7, Insert a Nested Table, for the Links.
Insert within the Table Row 7 a Table, four columns, as shown below.
In each table column type in the link names.
Interests |
Fav Foods |
Places |
Home |
When all typed in use the Indent command to align the names. This is done by placing the cursor at the beginning of each name, then using the Indent Command, indent the word.
Creating the links:
Place the cursor over Interests and in the Properties Bar Link Space type in interests.html
Then run the cursor over Fav Foods and in the Properties Bar Link Space type in favfoods.html
Then run the cursor over Places and in the Properties Bar Link Space type in places.html
Finally run the cursor over Home and in the Properties Bar Link Space type in index.html
You have now created all your links but not as yet the other pages.

7/. Testing the links.
Open the Index Page in the Browser, then select each page and make sure all the links work back to the Index (Home) Page.
8/. When all the links work - save the page again as template, then:
Then save the template page again as:
Index
Interests
Fav_Foods
Places
You then have a set of four webpages, which are linked with each other, ready to add the content - images and text, from your webpages folder.
Page Headings.
Open all four pages.
The Index Page heading is - Your Name - Website Home Page.
The Fav_Foods Page - My Favourite Foods Page.
The Interests Page - My Interests Page.
The Places Page - Places I Have Been to (or would like to go to).
Save all pages.
9/. You are now ready to insert your images and researched text descriptions, in each webpage.
The text descriptions would have been saved in a Word document you saved as Word Webpage notes.
In your Index Page.
Then In the Row 2 left table, insert the first image.
In the Row 2 right table, from your webpage notes, make an indent (from the Properties Table) and copy/paste the content for the image.
Insert your first image of five. Make it the one that stands out the best (to capture your audience). Then copy/paste the text content in the right column, from your word webpage file.
The continue with the other five images and text content.
Save your Index Page frequently as when completed .
When finished go to the next page and do the same and continue until all the other three pages are completed.
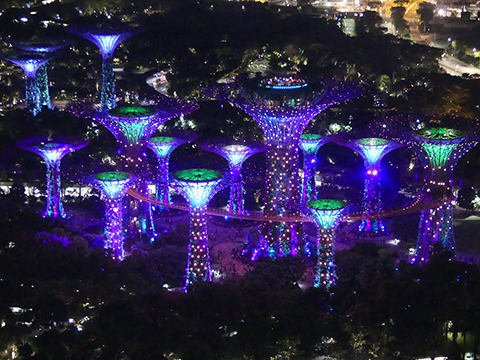
Below is an example of what your page should look like.

 |
|
Having completed your Index Page, move onto the other pages.
When all done, you have your website!