How to Create a Cinemagraph in Photoshop.
The preparation stage for creating a cinemagraph is quite complex and needs to be done properly, otherwise a lot of productive time would be wasted.
First - you need to find a suitable Youtube video, which is not as easy as it sounds. Then you need to sort out what type of video you are going to use. The video needs to have a moving foreground and background. One of which you are going to freeze and one of which is to stay active.
The type of Youtube video you could try could include: Pouring coffee, pouring water, fireworks, night traffic, cities by night.
Then you need to work out which scenes you want from the video and this should be no more than 3mm on the preview slider, which depending on the movie format shall be between 80 and 150 layers. Some Youtubes are a higher quality than others, using a larger frame rate. More than about 150 layers probably won't save as a cinemagraph. You'll only find this out when you go to save the file, it just won't save.
After finding the right video, you need to have a Youtube downloader, such as YTD Video Downloader to save the Youtube video.
It's a case of trying. Make sure you save the original Youtube, as you may well need several attempts to 'get it right'.
Linked below are five examples of cinemagraph made off downloaded Youtube videos. Click on the original still image to see the weblink to the cinemagraph.
The 'how to' steps follow on from the examples.
Click on the still images to view the cinemagraphs. All these cinemagraphs have been taken from full movement videos, downloaded from Youtube.
 |
 |
 |
 |
1/. After selecting your Youtube video, save it to your login folder. This could be a lengthy process, as the video needs stills and action, to make the cinemagraph work properly.
2/. Play your video, to see which scene you are thinking of making your cinemagraph.
3/. Open Photoshop and go to Windows/Timeline option and open the Timeline.
4/. Import your video, File/Import/Video Frames to Layers.
5/. Select the part of your video, by the command Import/Video to Layers.
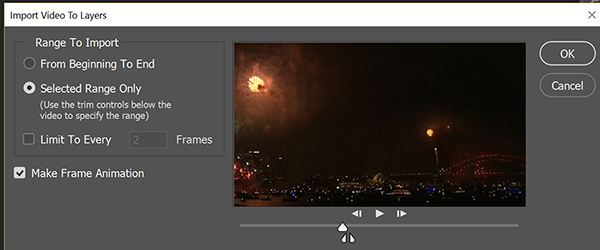
6/. The following dialogue window then appears.
You want Select Range Only, Limit to Every two Frames and the Make Frame Animation selected.
In the screen, the video plays when you drag the slider along. It is here you make the decision which scene you want to use, then using the left and right toggles, mark out the section you want, remembering 2-3mm is the maximum, which produces between 80 and 150 layers. If you make it larger, the video is more than likely to crash when you go to save it. If you have chosen too many layers, the best thing to do is close the file and start again, as deleting layers in this case does not work.
7/. The Timeline now looks like this. At the bottom left, you can change the repeat play command to Once, or a Set Number of replays, or leave it at the preset Forever.
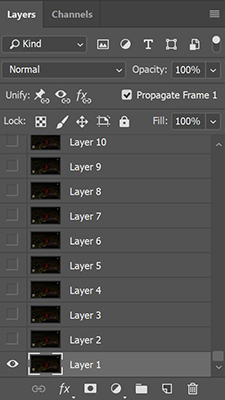
8/. Now go to the Layers window and select Layer 1.
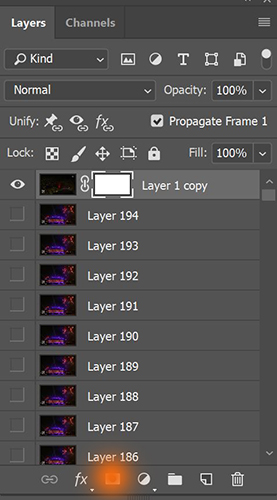
9/. Go to Layers on the Menu Bar and select Duplicate Layer. Name it the default Layer1 copy. Slide Layer1 Copy up to the last layer (at the top).
10/. Select the Layer Mask (shown in orange above).
11/. Decide which part of the video is to stay moving and which part is to be the still. Not all the video can move, as it will defeat the purpose. Make sure the moving part appears through most of the scenes, otherwise there will be a black spot where it doesn't play. Small sections of black are okay though.
12/. Select the Brush Tool, from the toolbox.
13/. Ensure black is selected as the top colour in the colour selector in the Toolbox.
14/. Run the brush over the area you want the movement to occur. You may need to change the brush size to cover the moving object.
15/. Play your video through once to check it works correctly. If it works as required, go to step 16. If it does not close the file and start again.
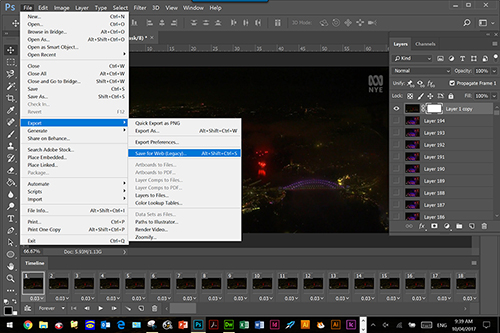
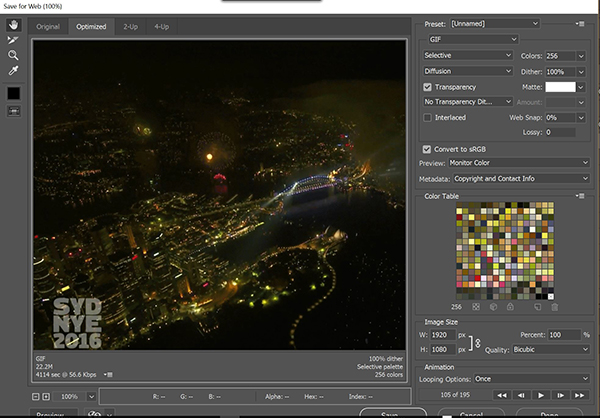
16/. Now it comes to the 'reveal all stage'. First play the video again and if alls good, go to File/Export/Save for Web Legacy.
This screen will then appear:
17/. Select Save and this is the point of reality. The window should hopefully pop up with the save location and asking for a filename. Name the file and select Save. All being good your file will save and you will not have to use the Done command, as the window should close automatically. The Save button is at the bottom, partly obscured above.
18/. If you then get an error message it will be that your cinemagraph is too large and you must start all over again! There is no going back!
19/. Once saved open the cinemagraph in a browser. Don't just double click on the icon, as only a still image will appear.
20/. Play your cinemagraph (right click on the icon and then open with a selected browser) and if all happened the way you wanted it to, you are done! Otherwise start all over again.
Happy Cinemagraphing.