A Simple 10-Step Guide to Making your Short Film (adapted from a web article by: www.if.org.uk/filmcompetition/10-step-guide
Step 1: Brainstorming
Think about the purpose of your story.
Is there a single issue that is unsettling your life and that you want to tell the world about?
Step 2: Planning
Now you have a rough idea of the theme of your story, take some time to explore how you want to say it.
Think about - do you want to make a documentary? Or do you want to make a drama? Do you want to use animation?
Who else needs to be in your film? Do you need other participants and how old are they? If they are under 16 years old, then you will need to have permission from their adult parent or guardian to allow them to take part in your film.
What is your production schedule? Do you have equipment? Time? People’s time? Places? Will you need permissions for non-public locations?
You probably won‘t able to answer all of these questions now. Document in your story.
Step 3: The Story
Now you can begin to piece together your storyboard your ideas..
You will need to create a script. You might want a tight script where actors speak word-for-word or you may wish to have the characters improvise, giving them a stimulus.
Step 4: People
Who are the characters in your story? Take some time to make a family tree of your characters and think about how they link together. Think about their backgrounds. Try and make them as real as possible: What will they wear, eat and drink? What is their family like? Why are they in the film and what are they saying to the audience? You may have some key words or phrases they will say.
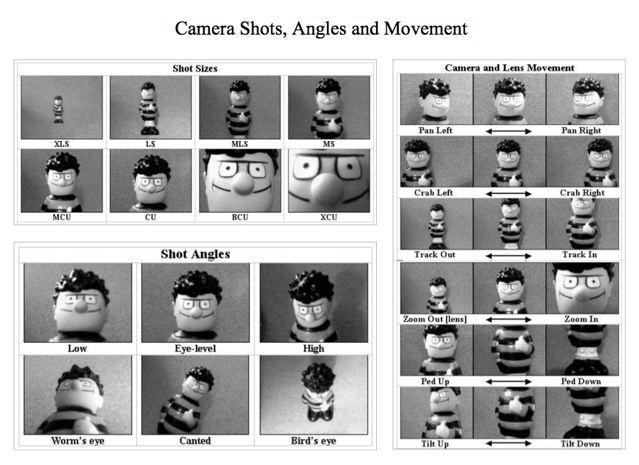
Step 5: Framing
The way that you shoot the film is an important part of getting the film right. Now is the time to experiment with basic camera angles.
Pictured here are the main shot sizes, camera angles and movements
If you have never filmed before, take some time to practice these shots before making your film and see how they can relate to what you want to say.
If you are interviewing you might wish to do some extreme close ups of hands or the facial expressions but remember to do these after the interview or have a second camera remaining the whole time on the interviewee’s face.
Step 6: Storyboards
Now you have an outline of a script, and an understanding of the various camera angles and shots you can use, you should begin to merge these to break your story into scenes to make a storyboard. A storyboard looks like a comic book, with pictures of scenes and a description of what is happening in the picture and/or some dialogue.
A good storyboard will piece together the beginning, middle, and end and help you to think of how to visualise each scene using which camera angles and shot sizes.
Step 7: Scheduling
This is probably the trickiest part of film-making.
Now you have your storyboard, you may find some of your scenes happen at different times in the story but in the same location. This means when you make a schedule of filming your scenes, that you do all of the different scenes in the same location on the same day.
Be careful! You characters may need to be wearing the same clothes for different scenes on different days that in the film are the same day. This is called ‘continuity’.
Scene |
Location |
Props / Dress / Equipment |
Notes |
Costs |
Scene 1 – Rosie in her bedroom crying |
Bedroom |
Rosie wears jeans and red top |
Film day one – need red top |
58p packet of cookies, £3.50 sandwich |
Scene 2 – Rosie watches news |
Living room |
Rosie wears jeans and red top |
Film day one – need red top, TV. |
|
Scene 3 –Rosie asking for jobs in restaurants |
High Street |
Rosie wear jeans and red top |
Film day three – need two cameras and need red top from day one |
£10 lunch in cafe |
Scene 4 – Rosie annoyed at still being unemployed |
Home |
Rosie wear jeans and green top |
Film day one – needs green and red top |
|
Filming takes longer than you think! Try to film one scene from your storyboard and this will give you an idea of how long it will take to film the entire film.
Step 8: And Action - Filming
Now comes the fun part: the actual filming.
Try and film the same scenes from different angles so that when you edit, the audience will have different things to look at. If you only use one camera, film the same scene several times from different angles. Be prepared to have hours of footage for what will be your final 3-minute film. Allow for around two hours of filming per scene or per 30 seconds you will use – this is based on when our youth worker makes movies with youth groups.
Time coding is also really crucial for when you begin to edit your film. You need to have a pen and paper ready to record the various takes of your scenes and record the time codes next to them (this is the time set on your video camera) so that when you come to edit, you know that, for example 19:13 (19 minutes 13 seconds) was your best take for scene 5.
If you are using digital video camera, you may find it best to simply delete the scenes as you go along so you only have the ones you felt worked.
But be careful of deleting scenes too early! You may need some other angles and though the whole scene may not be how you wanted it, you could edit two not so perfect scenes to make the perfect final cut.
Scene |
Take |
Time Code |
Notes |
Editing Notes |
Scene 1
Rosie Cries |
1 |
00:00 – 00:23 |
Rosie giggled instead of criedECU Rosie’s eyes |
Use 00:10 – 00:14 Good sad eyes for Rosie |
Scene 1Rosie Cries |
2 |
00:23 – 00:45 |
Perfect |
|
Scene 2Rosie watches television, bored |
1 |
00:45 – 02:02 |
CU on Rosie face,CU Rosie’s hands holding television remote |
|
Step 9: Post-Production
Now comes the most time-consuming part: Editing or post-production.
You now have your script, storyboard, schedule and your time-coded notes on how all your scenes went. Using all your resources, you can begin to piece together your film.
If you are new to editing, then look up a local youth club where they have film editing equipment and a youth worker to help show you how to edit. In this course you will be using Adobe Premiere.
Feedback: Once you are happy with your rough cut, review it to people who can give you an honest opinion. Use these comments to polish up your rough cut until you have your final cut, making sure you have all the information you wanted to convey in the film as well as continuity and that the final film is under the planned time limit.
Step 10: Submit
Before you send it off to the teacher to assess, ensure you have checked and re-checked your video and sound qualities and the continuity.