How to Create a Cinemagraph in Photoshop.
Cinemagraphs are complex to make, but fun to watch after they are done.
Basically you take a suitable YouTube clip, cut out a small section and then freeze some of the movements. Basically you need night scenes to make it all work. (At school Youtube is unavailable to junior years, so there are some samples provided for you).
1/. Open Photoshop and ensure the Timeline is on. If not Window/Timeline.
2/. You need to find a suitable video on Youtube, or better still use one of the samples provided on the class USB. A great suggestion is fireworks or night traffic. The lights on a dark background work really well! There are YouTubes on the class USB to use and all are suitable.
3/. You then need to play the YouTube video to work out the small (under 20 second scenes you need).
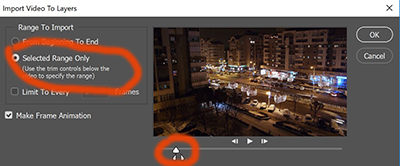
4/. Open the YouTube in Photoshop, by File/Import/Video Frames to Layers. This will open the whole YouTube video. Make sure the Select Range Only is checked and using the selector controls at the bottom, locate where to start and where to stop. As you can see from the screen shot below only 2 - 3mm is needed and this will fill 180-200 frames, which is quite enough to work with for now.
5/. The selection will load into the Timeline. If you get a "size of video warning" you have a too large a selection. More than 200 frames for instance is large.
6/. Go to the Layers Dialogue Box (right bottom of the screen) and select Layer1 (at the bottom of the layers). Then right click on Layer1 and select Duplicate Layer. Drag the Duplicate Layer right up to the end of the layers. It must sit right at the top.
7/. Back down at the bottom of the Layers Dialogue Box, select the Layer Mask icon. The one that looks like a camera lens and next to FX). In Duplicate Layer1 a Layer Mask will appear. Ensure the "eye" appears on this layer. If not click on it, as it must be "active".
8/. Go to the Paint Brush on the Toolbar. Make sure it's the Paint Brush and NOT the History Brush (they look similar). Then check your colour palette and change the colour to black on top and white on the bottom 9/. Check what you want to move and what you want to speed up (freeze). Using the paintbrush paint over the freeze. There should be no colour, not even black. It's a transparent Mask.
10/. Click on the play button and run the cinemagraph. If all is good move on. If you have a black line where you painted, you have an issue with the layer mask and you need to re-do the Layer Mask.
6/. Play the selection through to check all is in order.
7/. If necessary you can slow down the frame rate/ speed it up, or slow it down depending on what sort of outcome you want, from the default four seconds to say six or even eight seconds or speed it up to maybe 0.5 seconds. Just select all the frames and right click on the number of seconds at the bottom of one frame and they will all change.
8/. Check and cross-check again in the Play mode.
8/. Save the final video. File/Export/Save for Web Legacy. The format will be .GIF, which is actually an animated GIF.
Linked below are some examples of cinemagraph made off downloaded YouTube videos. Click on the original still image to see the web link to the cinemagraph.
 |
 |
 |
 |
More cinemagraph examples - are linked here.
Happy Cinemagraphing!