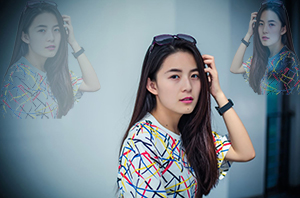
Fading Scenes
Again, here's something different!
This task comes in two parts. Part A , which is directly below consists of one image repeated in different modes.
Part B, which you do after Part A, is more complex with three different images.
There's a lot of use of Free Transform and the Layer Opacity function.
1/. First you need to find an image to work with. Preferably with a not too detailed background. See the example.
You then need to make some changes to this image.

Now see the result.
This is an easy exercise using Layers, Edit Transform (CTRL T) and the Layers/Opacity command. There is also the background removal to a clear GIF.
2/. Open the original image. This is your background, to build the other changed images onto.
3/. Check the image size, then File New/Transparent Image, the same size.
4/. With this second image, remove the background, by : The Magnetic Lasso Tool, the Eraser, the Magic Wand Tool, the Quick Selection Tool. (All or some of these will be necessary to clear the background. Save your final adjusted image as a CompuServe GIF (Not a JPG, as that would give you a white background).
5/. Copy/Paste this new adjusted image to the Background Image.
6/. Using the Edit/Transition command (or CTRL T), position the image on the left side top of the background image.
Then resize the image using the corners, to maintain proportions.
Then using in the Layers Dialogue box the Opacity command reduce the density of the image (similar to the example above).
7/. Back to the GIF image, Image Adjustments/Rotate Canvas/Flip Horizontal.
8/. Copy paste the rotated image onto the background and repeat 6/. above. With the Opacity, adjust it lighter/darker depending on your background.
What is needed are the two smaller images not to compete with the background image.
9/. Save it as a .JPG and you are done!
Now for Part B:
B1/. First find two images to compliment your same background image.
B2/. Then File New/Transparent Image, the same size as the original. Do this for both images. The second image will be transformed to face left.
B3/. You are following steps 3 - 9 above.
The Opacity is most important, so as to not "take over" the original image, as is the image size.
